You’ve got your RDA, wire, and wick. Now you’re ready to build your first coil.
Safety first. If you build a coil with too little resistance and use it on a device without safeties (like a mechanical APV), you will probably destroy your battery, could destroy your APV, and might get hurt.
- It is imperative that you test the resistance of your coil before you put power to it.
- Do the math using Ohm’s Law, and figure out how much current you are going to draw with that coil.
- Know the limitations of your battery and device.
- Don’t end up with a Darwin Award, or in the news.
Ok, on to the fun stuff!
Material choices
Essentially you need two things to build a coil:
- Wick material
- Coil material
There are something like a dozen different materials that can be used for both the wick and the wire, each having its merits and drawbacks. For someone who has never built a coil, the material selection alone can be a stopping point.
Wick Material
Some of the more common materials used for wick include:
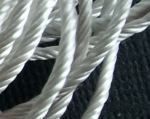
- Silica (this is essentially quartz that is spun long and twisted together into various diameter cords).
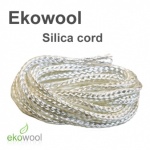
- Ekowool (this is a specific brand of silica that is braided rather than twisted, so it frays less).
- Cotton (many use undyed, unbleached 100% cotton yarn or cotton balls – cotton must be boiled and washed thoroughly before use unless it is marked as sterile).
- Stainless steel mesh (this is very finely woven stainless steel thread, ideally raw 316L stainless, in #325, #400, or #500 – this number denotes the number of threads per inch in the mesh).
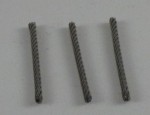
- Stainless steel cable (with cable it is vital that only raw stainless steel is used, do not use galvanized stainless steel for anything vaping related).
Let’s take a look at some of the benefits and drawbacks of these materials.
Silica
Plain twisted silica cord is some of the cheapest and most readily available wick material. Silica is glass, so a torch will not ignite it (at least not a hobby torch), and it takes a while to even get to the point where it glows. Twisted silica also tends to fray very quickly and can be difficult to thread into coils.
Some people have health concerns with silica, as there are links to lung problems and the inhalation of small quantities of silica. There have been no studies of this in relation to vaping, but if you wash your wicks and rinse your deck after building a coil it should not be an issue.
Ekowool
Ekowool improves on twisted silica by using braided construction. This makes it much more resistant to fraying, and (in my opinion) better at wicking. The primary drawback is price; Ekowool is about ten times as expensive as plain twisted silica.
Ekowool comes in two varieties, hollow braid, and hollow braid with internal strands. The hollow braids tend to flatten out, which can make getting good contact with the coil difficult in some configurations (though it is not terribly difficult to achieve).
In theory the braided construction of Ekowool should also reduce the possibilities of small silica particles breaking off of the wick and being inhaled (not that this is very likely to begin with).
Cotton
Cotton is used primarily because it is cheap, but it also gives excellent flavor. The major drawback of cotton is that it is flammable. When using cotton wicks you must take great care to avoid letting the wick go dry, as it will burn almost instantly if not saturated, and once burned, must be replaced (unless you like a horrid burnt taste in your vape).
Stainless steel mesh
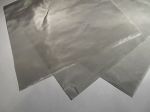
Stainless steel mesh is primarily used in Genesis style RBAs (which are beyond the scope of this post), but is sometimes used in RDAs and recoiling protank heads. Stainless steel mesh is quite expensive (as much as $20 for a 2″x6″ piece in some places. It also lasts a really long time and is fairly easy to reuse. Some vape shops and websites sell these as pre rolled wicks for a bit less than sheets or swatches.
The primary concern with using stainless steel mesh as a wick material is that it is raw stainless steel, not galvanized or coated in any way. Aside from buying this from vape specific stores or websites, this material can often be found in (or ordered from) specialty hardware stores. It is mostly used in filtration products.
An interesting thing to note is that the coarser weave mesh (like #325 mesh) will wick better than the finer weave material (like #500 mesh).
The really frustrating part of working with SS mesh is that it is conductive, and must be oxidized very well to prevent shorts. Even with thorough oxidizing (repeated torching and quenching), it is quite easy to scratch the oxidation off and the result is hot spots and shorts.
I do not recommend working with stainless steel mesh or cable for those new to coils.
Stainless steel cable
As with Stainless steel mesh, ensuring that the material is raw stainless steel is the primary concern.
Stainless steel cable is most commonly used in Genesis style RBAs, though I have seen some use it in RDAs. I personally find it to be terribly difficult to work with in RDAs. It frays rather easily, and does not do a great job of holding juice (though it can wick very well in vertical wick applications as found in Genesis style RBAs).
As with SS mesh, SS cable is conductive and must be thoroughly oxidized before use, is easy to develop shorts and hot spots, and sometimes frustrating to work with.
These are by no means the only wick materials used in vaping, and the choice of wick material is largely based on individual preference. I like to use Ekowool if using silica, as I personally feel that it is both the least problematic to wrap with, and also provides very good flavor while minimizing the risks and frustrations of silica wick.
Currently I am favoring cotton, and will generally recommend it over any other type of wick.
Wire material
Common wire material used includes:
- Kanthal A1 resistance wire
- Kanthal A resistance wire
- Nichrome resistance wire
- Ribbon Kanthal
- Bakero wire
Kanthal wire has become the standard for vaping, due primarily to its cost and high heat tolerance. Kanthal A1 coils will outlast nichrome coils by a wide margin.
Bakero wire is relatively new to the vaping scene, and is not yet widely available (it’s also ridiculously expensive), but there are people who swear that it is the absolute best wire for coil building in the history of vaping. I have not used it, but the videos I have seen of it in action keep me from dismissing it on price alone. Maybe one day I will find a vendor that sells it in sample sizes and give it a try.
The only factor other than personal preference in determining coil material is the space available on the RDA/RBA, and whether the posts have holes in them. I personally like ribbon kanthal, but it is incredibly difficult to use on an RDA without post holes (like the IGO-L). Some of the smaller atomizers (like the AGT) require using wire with a higher resistance (I wouldn’t want to try to wrap on an AGT with 28g kanthal).
I strongly urge those new to rebuilding to buy a variety of wire sizes to determine what is best for them.
Basic 4/3 (or 5/4) wrap coil
Before we get started here, just know up front that the first coil you wrap is probably not going to work out. Mine didn’t. My first mistake was in not using enough wire, so the coil did not provide enough resistance to fire on my APV (I was using a regulated APV at the time, because I didn’t want to accidentally “discover” what sub ohm vaping was like on my first attempt.
Just figure that the first couple coils are not going to work out, but they are good practice, and you’ll be pleasantly surprised if you nail it on your first attempt.
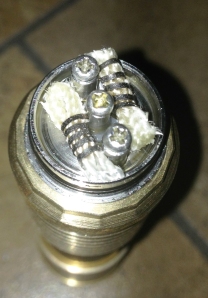
You’ll hear people refer to a coil as a 3/2 wrap, or a 4/3 wrap. This is nothing more complicated than a count of the loops in the coil. If you look at the picture at the very top of this post, that is a drawing of a 4/3 wrap. There are four loops on one side, and three on the other. So a 5/4 wrap would have one more loop in the coil. Nothing earth shattering, but it can be confusing if you’ve never had it explained.
First you have to decide what size wick and wire you’re going to use. This post could easily get out of hand with all the different possibilities, so I am going to just make arbitrary choices and tell you why I am doing everything here.
For this example I am going to use 30g Kanthal A-1 wrapped on 2mm Ekowool wick in a 4/3 wrap, mounting on an IGO-L. All of those choices are arbitrary, I simply had large quantities of those materials laying around.
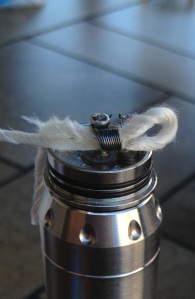
First you need to decide how you want the wick to sit in the RDA. You can get away with just a short length of wick that is not much longer than the coil (shown in the first picture below, ignore the ribbon kanthal), but I like to leave one side a little long to hold a bit more juice as shown in the second picture.
Actually wrapping the coil
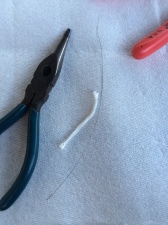
Here are the raw materials of our coil:
That is approximately 6 inches of 30g Kanthal, and about 2.5 inches of 2mm Ekowool.
Both the wire and the wick should be thoroughly torched to remove any residue from the manufacturing process before proceeding. Torching (with a butane torch, not a bic lighter), will make the wire a bit less “springy”, allowing it to hold its shape better. It will also make the Ekowool tighten up and stiffen a bit. Be aware that both of these materials conduct heat very well, and should be held with pliers during the torching.
In the picture above, you’ll notice that the cut on the left side of the wick is much cleaner. I cut both sides of the wick with the same snips, the one on the right was done before torching. If you enlarge that picture, you’ll notice some white flecks sitting next to the freshly trimmed side of the wick. This is powdered Ekowool. You do not want to be breathing this stuff, which is why it is important to thoroughly rinse your wick after mounting it to the atomizer deck.
There are basically two ways you can wrap the coil:
- Wrap around the wick
- Wrap the coil around a tool and thread the wick in afterwards
I prefer the second method in most cases (though in some cases it is not practical to do it that way). The even sizes of Ekowool are one of those exceptions. Ekowool is a hollow sheath, and in the odd sizes, it is filled with strands of silica wick (or cotton in some cases). When wrapping the even sizes (like the 2mm I am using here), it is simply easier to wrap directly around the wick (unless you are going to double the wick over) because the wick tends to flatten out.
This is personal preference. I find it easier to wrap around something else, mount the coil on the atomizer, and then thread the wick in.
Keep in mind that you don’t want to choke the wick with the coil. You want to allow the wick enough room to draw the juice in to the coil, but still be touching the coil.
Regardless of where you choose to wrap the coil, there are two methods for wrapping a coil:
- Freehand
- Use a tool
I prefer to use a tool to wrap coils (something small and rigid to keep the coil straight), as it requires less dexterity to get a decent coil, and can help with mounting the coil to the posts.
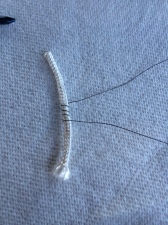
Here is a picture of my freehand 4/3 wrap of 30g Kanthal on a piece of 2mm Ekowool:
Mounting the coil on the atomizer deck
If you wrapped around a tool, don’t remove the tool before you mount the coil to the atomizer. The tool will stabilize the coil during the mounting process. In this case, I did not use a tool, so I just need to be careful not to deform the coil or bend it.
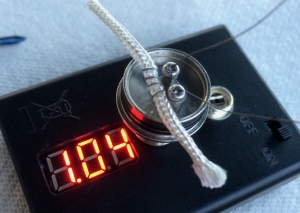
In this image you can see that I have the coil mounted to the atomizer deck. Because I have done this a time or two, I know that there is something not right here, because this coil should be slightly higher in resistance. I will tighten down the screws a bit, clip the coil legs to size, and adjust the coils a bit and check again.
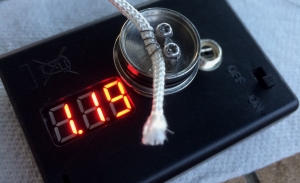
Better. Now If I were planning to use this coil (I’m going to rewrap this with a micro coil and cotton build momentarily), I’d want to get the wick adjusted and test it again before firing it. Since this coil is history in a minute, we’ll call it good and fire it on a mod to see how it heats up.
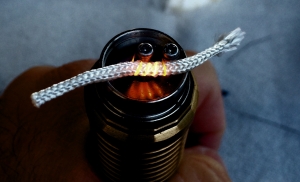
Not a great photo, but you can see that the coils are glowing evenly, and the glow started from the middle of the coil and moved out to the edge.
I always “pulse” the coil a few times (don’t do this with cotton wicks) to ensure it is not going to pop or short. Pulsing is nothing more than firing the mod rapidly until the coils glow brightly with no juice in the wick.
Things to look out for
- Make sure the coil is not touching the top cap, posts (other than where it is fastened), or deck of the RDA.
- Make sure there are no coils touching.
- If you make the legs of the coil too long where they attach to the posts, you will develop a “hot leg” (where the coil gets hot fastest, is not cooled by the juice in the wick, and will likely break first).
- You can adjust the coils with a flat tip screwdriver or a toothpick if they are touching or too close together.
- If you are building with the atomizer deck on a device, make sure that the device is off or locked before you proceed. Coil burns are not fun.
Measuring resistance on an RDA
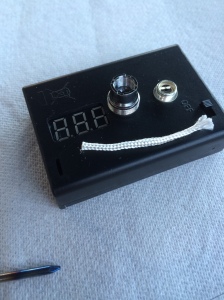
I cannot state this enough: you must check the resistance of your coils before firing them on a device. It is all too easy to short an atomizer and damage your device. Resistance checkers designed specifically for vaping (such as the one seen throughout this post) are relatively cheap (the run about $20 pretty much anywhere), and can save you lots of grief (and prevent the possible destruction of your device).
If all you have is a multimeter, I highly suggest that you buy a pre-wired 510 connection. You can then attach some aligator clips to the pre-wired connection and use those to clip to your multimeter leads.
Why would you go to that trouble when you could just touch the multimeter leads to the atomizer’s 510 connection? Because it’s not as easy as it sounds and requires very steady hands (not to mention a fair bit of dexterity) to get any kind of accurate measurement from a 510 connection using just multimeter probes.
So there you have it. You’ve built your first coil. Now you can try out all the different combinations of wick and wire (not to mention all the different kinds of coils), until you find something that is right for you.
Good luck!





Great Post! but i have a question. Under the “Things to look out for” you said you don’t want the coils touching, but in one of the photos you show is the coil wrapped super close together to the point were they are all touching. Is this just another way to wrap coils? Or were as you need them to all touch or none at all type thing?
Two different types of coils. A contact coil should have all coils touching, a standard coil, none of them should be touching. You want one or the other or you risk hot spots.
Gotcha thanks for the help!
Is there anything different that needs to be done when building a dual coil dripper verses a single coil?
Like what? Obviously you’d need to halve your resistance, so if you made two 1 ohm coils, the atomizer would be 0.5ohms total. There are some tricks, such as using a single piece of wire to wrap dual coils rather than making two individual coils and then trying to fight to get both attached to the center post, but I’m not real sure what else you might be looking for. There are literally dozens, if not hundreds of ways to wrap coils, and this is just a starter guide. If you have specific questions I can try to address them.
The only difference is on a daul coil you will have your coils on opposite sides.
I’m new to mechanical mods. I have the Kamry K100 (which i overpaid for ) I plan to buy atomizer deck. But I have no clue what the ohms should be at. I’ve seen some interesting coil builds on youtube. I want to try other builds but i don’t wanna blow anything up. Anything you can recommend or share would be appreciated, thanks! Great article btw!
You should probably read this post, and pay especially good attention to the parts about battery safety.
The resistance of your atomizer is determined by your battery. DO NOT EXCEED THE CAPABILITIES OF YOUR BATTERY, and you’ll be fine.
I would start with either an IGO-L or an IGO-W for a first atomizer. They’re great for learning what you need to know to get into rebuildables.
download a simple ohms law calculator and you will see (on a mech mod as i use), the wattage and amps,,,,, http://www.rapidtables.com/calc/electric/ohms-law-calculator.htm
then you’ll see why we use 30 amp protected batteries eg sony vtc3, 4, or 5………… or mnke 30 amp as i use…happy vaping
Question. Long story short, I went to the vape store yesterday. dude built my coil for me and hooked it all up. everything was perfect, heating evenly etc..but the juice it, burned some off. it was smokin like crazy. then put a little more in it. i left all was good. but got home and was messing with it… took the top off so i could see inside, fired it up..but my coils werent cherry red and it wasnt smoking like ive seen it do before…is it suppose to be like that? when it has liquid in it, does it not get red bc it cools it down some? and my battery is new and fully charged. Help please, im new with this
When coils are kept wet by juice they usually won’t glow (unless maybe it’s some crazy sub ohm build). I don’t know enough about your specific set up to comment on if what you are seeing is normal for your build.
Hello i just baught a bre=and new RDA stillare and everytime i make a coil it never turns on and dosent make anyvapor when i turn on my battery what do i do!!!
Check it for shorts. I’d need to see it to offer any other advice.
See if your coil is touching the positive or negative posts.
Can you help. Im new to building and im trying to build a dual coil wih 28g and 7 wraps but it takes a long time for them to glow, like about 4 seconds. Any advice would be really good right now.
Generally long coils take longer to heat up. What device are you using? What are you wrapping around?
Thanks for getting back. Im using a k100 around a 2m drill bit. I just done another build with same set up only im using 26g now and it heats up alot quicker but my only problem now is getting them to glow at the same time and also glow from the inside out. Ive seen people pressing there coils with tweezers but what are they actually doing to them to make them glow.
hi a question i bought a svd and it lets me check my ohm level and resistance by pressing the button if i build my coil can i check with that? i am using efest 18650,18500 and 18350 batteries whats the safest resistance and im using a nautilus mini but i just bought a Nimbus v3 Clone and i wanna build my own coil please help
You can use built in resistance checkers, though they are usually not terribly accurate. Resistance calculations require that you know two parts of the Ohms Law equation. Use an online calculator and input your resistance and voltage to get your Amp draw. Once you have that, you need to find the CDR rating for the battery you are using. Stay 10% under your battery’s max CDR and you’ll be fine.
Hi, I have a Tobh V2 Atty RDA with an Manhattan mod fit for an 18650 battery. What size wire would you suggest I use and how many wraps? This will be my first time building.
How do I fix my dual coil build so that they light at the same time?
I used 28g 5 wrap dual parallel coil build. they both light from center to outer but 1 side lights faster then the other.
Hi there, I have a MVP 20w and a RDA I’ve tried a few things but my battery says there’s a short somewhere in it. I’ve asked a few people and they have said to make it a 1.5 ohm or a little higher for my battery to work. So I have 24g wire okay how many wraps do I need to make to make it 1.5 ohms? Tighter wraps or lose wraps? 1 or 2 coils? Kinda new at all this..
I’m no pro when it comes to building all types of coils, just usually more basic kanthal 4/5 or 6/7 wraps, etc. BUT what I can tell you that (I believe) is the prob is your wire gauge is used more for sub ohm coils & you only have a device w very low power/ wattage. 24 gauge & the lower gauge numbers take up a whole LOT MORE POWER from a device & highly doubt that it’s suitable…. You would probably need a sub ohm device capable of 60-80+ watts. With your 20w mid, I would suggest using at least a 30-32+ gauge kanthal – though thinking about it, a 34-36 gauge may actually be best suited…. The THINNER & LONGER your wire, the less power required from your device/ battery to heat it up… The THICKER & SHORTER the wire gauge, the MORE POWER needed to heat it up properly (as in sub ohm mod devices) – which also can lead you into dangerous territory if just learning to build your own coils….
Hey I got the god mod 180 it is great but I can’t seem to figure out a good build for it I have a 1 24 gauge 5 wrap and it comes in around .40 ohms but I want more vape clouds and vapor help plz ?
You probably want different kanthal. 28 gauge should do the trick.
Hey Mr. Sandman. I just got into the world of vaping, coil building and vw/vw mods/ mechs.
I been reading different pages, watching videos and carefully following suggestion for builds. But for no prevail i get disappointed with the build. I have a paragon v2 mech and an orchid rba. I build my coils according to the suggested ohms but when done, i get no vape.
Here is what im working with.
26g kanthal wire
18650 efest purple 2500mah battery
Orchid v4 rba
I build two coils @ 1. ohms each. but i get no vape.
Is there something i am doing wrong?
Dual coils at 1.0ohms should give you a 0.5ohm total and a pretty good vape. Have you tried it with a single coil to see if it fires at all?
When i place the 1ohm coil @8 wraps it fires once and then i have to let it cool and ramp fire again for it to ignite. It takes 3 ramps for it to vape.
Have you tried the atomizer on anything else? May be an issue with the positive pin length. Do you have another device and or another atomizer? Might also be a short somewhere. If you can’t find the issue you should probably take it to a vape shop and see if anyone can find the issue.
Yeah i have 2 Orchid v4s and a Mutation X v2 RDA. Built all the same way for the Paragon v2 and it wont fire like before. I am speculating it might be the mech not working like it did before. Maybe i do need to take it to the vape shop. Odd thing is that it works on my ipv2s, but i want to make the mech work for being my side piece. Thanks for all the help and great info.
Have you looked to see if your mech has an adjustable positive pin? You might need to screw it out a couple of turns.
Yeah it does and it looks like its damaged. Its silver platted and the copper is showing. Is that a bad thing?
Well it’s not ideal, but it’s not the end of the mech. Many mechs use silver plating, and some coating is thinner than others. Wear isn’t unusual. I’d try screwing it out maybe a half a turn and see if that gets you better function. If the center pins aren’t making good contact you’ll get intermittent function like what you’re describing.
If the center pin is super tarnished you probably want to clean it up. If it looks tore up, you may want to hit it with some fine grit sandpaper to knock it flat so that you get better contact.
Another thing I realized is that I’m building the coils on a high resistance of 1ohm each on which it goes to .5 ohms. Seems that I need to build .5 ohm coils to run it .25 dual. Burning to cool on .5 ohm. 26g kanthal is not good to make a 5/4 coil due to not enough length on the wire. Going to purchase some 24g and try that.
I just bought a mutation rda for my ivp4 and I’m trying to build my first coil for it , none of the wraps are touching each other or the posts and I’m wicking it very throughly but it keeps tasting burnt. It’s a .5 build and I’m only trying to start it 15 watts and I can’t figure out what’s wrong
I am using a Kanger sub tank mini, just used a pre-built Kanthal Coil and Silica Braided cord 2mm I am running 1.2 26gauge for my MVP20w the normal pre made coils and wicks are fine, but I wanted to play. But my question is should it taste burned? I am having a funny taste. Plenty of heat, and vapor just bad tasting. Is this normal and does it last?
Did you torch the kanthal to remove any machine oils before you used it? Also check the insulator. Make sure the atomizer head has the peek material insulators and not the silicon/rubber ones that were used initially. Those had issues with the taste you’re describing.
No torching occurred as I had no clue that had to be done. Also what do you mean by insulators? As I am new to vaping and have no clue about this stuff. Just trying no to smoke and really like this. Will the oils burn off over time since I have no torch?
I’ve always wondered if adjusting the diameter of the coil loops (say from 1.8mm up to 2.4mm), would cause any noticeable change in resistance? I’m assuming the answer is yes because the bigger the diameter the more kanthol is used which ups the resistance… Right? I’m also wondering if anyone has used the tools specifically for wrapping coils ( https://www.fasttech.com/products/2032001 ).
Running IPV4 mod with Royal Hunter dripper
I have Smok UDA RDA and i want to make exactly the same coil as “factory installed coil” was, what wire and wig do i need?.
I have 0,25 mm Kanthal and Silica wick 3mm, are those same as “factory installed coil” ?
Probably not, most factory coils are Nichrome wire. You’d need to pull a factory coil and measure the wire to figure out what gauge it is.
I about do my first coil where can i get the wire. Can i get it from a hardware store or do i have to go to a vape store im thinking about using 24g
OK so I have a double coil mod. It’s a smpl a-mod have both coils in but neither is even beginning to glow red there’s no heat at all idk what I did wrong but essentially what I have looks like the first pic u show
So I have a zebra x6 variable voltage battery with a stillare cartel v2 clone atomizer. I was just wondering what type of coils I should look to buy if I was to run primarily 3.4 to 3.6 volts. This clone produces a mean ass smoke on 3.6 volts.
Hello I’m new to rda! I would like to know what do you look out for when trying an rda? The battery and wire you going to build? Do I have to calculate them?
Yes you need to keep battery capacity and build safety as the top priority.
As for what you should look out for, that’s a huge question. I recommend starting with something like an IGO-W that is very inexpensive so that you can get familiar with building and learn what you like and don’t like about the RDA. This will inform your next RDA purchase.
Great article! 🙂
Now I know the idea is to inspire us to experiment for ourselves, but still I’d love to hear your experiences on the pros/cons (or simply difference in vape) resulting from:
1. Contact coils vs standard ones
2. One low resistance coil vs multiple coils in parallel, assuming the same resulting resistance
3. Low vs higher resistance coils, assuming the same resulting watts
4. Kanthal vs nickel vs titanium, again assuming we stay within the limits of say a 60w source that can handle 0.1ohm
Just hoping to get a sense of the direction that may interest me for initial tests. Thanks!
I had 28g @ 1.2 ohms @4.2v kanthal but it didn’t vape as well as my previous 26g kanthal coil with 5 loops @ .5ohms @ 3.2v. I was almost going to go go and buy the Lower gage wire when I had the idea to double my wire up. I twisted it up like a braid. On the meter it reads .4ohms with 5 loops @ 2.6v when full vape occurs on a 6sec lung hit. I can blind my tv out now. I am just trying it out for now but I am not seeing anything unsafe, however it might create hot spots in the wire Due to the radical bends in the braided coil. I’m set on 12.5w and no sizzle until 7sec lung hit. My unit is the Kbox sub box with lithium 4.2v battery, Yehaww…eh. I used a drill and pliers to twist it up. I also see that shorts are an issue, which I suggest being sure to clip your coil ends flush to the screws and bend the remainder inward so the coil ends don’t ground out to the burner case. Have fun
How do you connect the cool to the screws?
Depends on the atomizer. Many have holes in the posts that the wire is inserted into, and the screws hold it in place. Others do not have post holes and you must wrap the wire under the screw head, which will pinch the wire against the post and hold it in place when screwed down.
What atomizer are you working with?
im getting a duel coil and i dont have an rda deck what should i look for sense i dont have a deck?
Thank you for informative content and sharing your blog the best