

The Kanger Protank was released in 2013, and was fairly revolutionary for what it was; the first glass tank bottom coil clearomizer. This was the first tank I bought outside of the CE4s that came with my first starter kit.
Personally I love the Protank, but that doesn’t make it perfect.
The Protank comes in two types of packaging; a “kit” and a cardboard box (as seen above). The contents of these are the same but with the “kit” you get a decent quality hard case (that is rather larger than it really needs to be, but is fairly useful for storing some gear, though it’s not really large enough for mods or eGo type batteries larger than about 650mAh at best). Price difference is a couple of dollars.
Specs
Length: 60mm (2 11/16″)
Diameter: 19mm (3/4″)
Capacity: Nominally 2.5ml (it actually holds more like 3ml or so)
Battery Connection: 510 threads
What’s in the box:

Protank package contents – click to enlarge
- 1x pyrex glass tank with non removable chrome drip tip
- 1x steel base
- 1x eGo threaded beauty ring
- 2x replaceable atomizer heads (sometimes both 2.5ohm, sometimes one 2.5ohm and one 1.8ohm)
Pros
- Don’t have to worry about “tank cracker” juices.
- Replaceable atomizer heads (they run between $0.99 and $2 each depending on vendor and how many you purchase).
- Easy to clean.
- Easy to fill.
- Don’t leak (this sometimes requires minor adjustment from the user).
- Capacity.
- Cooler draw (bottom coil clearomizers tend to be this way).
- Airy draw (some people don’t like that, it can be adjusted, see the errata section for details).
- Atomizer heads can be recoiled and rewicked for even greater savings.
Cons
- Non removable drip tip (this is changed in the Protank 2).
- Occasional leaking or gurgling when less than 50% full (this can be fixed).
- Some units have had issue with tanks separating from the caps (this has been fixed in the Updated Protank released at the end of July 2013, all original Protanks now use a glueless design).
- Base 510 threads tend to snap off with relatively minor impact (bases are replaceable, and Kanger says this has changed with the Updated Protank release as they are using a “reinforced” base design, as does the Protank 2).
- Glass tank is prone to breakage if dropped.
- Airy draw (which can be adjusted, see the errata section for details).

510 threads – click to enlarge
Maintenance
You’re really only going to have three common maintenance tasks with a Protank:
- Assembling or disassembling the tank.
- Filling or topping off the tank.
- Cleaning it.
Assembling/Disassembling the Protank
This image shows correct assembly order of the parts:

Click to enlarge
Filling or topping off the tank
This is probably the thing you will do most often.

Filling the Protank – click to enlarge
Simply invert the tank, remove the base (including the atomizer head) and fill to just below the center tube as shown in the image above. Careful not to get the juice in the center tube. That tube leads directly to the drip tip, and if you get juice in it the juice will run right out and onto whatever is under the drip tip at the time (plus if you don’t clean it out afterwards, you risk leaking or gurgling as the juice runs back into the atomizer head). You should also ensure that the atomizer head is fully seated (just give it a good clockwise twist), as it has a tendency to unscrew after the Protank has been removed from the battery a few times. This can lead to rather bad leaking directly into the battery connection if it becomes too loose.
Cleaning the Protank

click to enlarge
Personally I find the Protank easy to clean. I just rinse if off with hot water from the sink, drop it into a glass of Pure Grain Alcohol (PGA – unflavored Vodka works just fine), let it sit for a few minutes (I usually just kind of swirl it around in the vodka for maybe 30 seconds, but if the head is particularly gunked up I’ll leave it in there for a while), flush it out with some bottled water, and let it dry. I do this every time, or every other time I fill the tank, and get pretty good life from my atomizer heads.
Errata
Gurgling/Leaking fix
The same fix for leaking/gurgling in EVOD tanks works for the Protank. Sometimes though you get gurgling for other reasons. Like if you spilled some juice in the center tube while cleaning, or a severe change in altitude or ambient temperature. Generally this only requires you to get the juice out of the atomizer head/center tube, and mop up any juice sitting on the battery connection. You can do this with a cotton swab. The mouth of the drip tip and the center tube are both plenty wide to accommodate a cotton swab head. Just push one down into the center tube until it is pressed up against the atomizer chimney, and invert the atomizer. Hold it there for a few seconds, and then pull out the cotton swab and do the same with the other end.
Usually there won’t be much juice in there, and the second end of the swab will come out pretty dry. If so, you can use that end to wipe off your battery connector too. If not, use another cotton swab.
Adjusting the airy draw of the Protank
I’ve already mentioned that the atomizer heads can be rebuilt, but this isn’t necessary for adjusting the draw. The Protank, Mini Protank, and Protank 2 all use the same atomizer heads, but the atomizer heads from the EVOD are also interchangable with the Protank (works both ways). This is great because the EVOD atomizer heads have a tighter draw, and will tighten up the draw on the Protank (it won’t be the same as an EVOD, but somewhere in between the two).

Click to enlarge
Also if you are using the Protank on an eGo type battery and have the beauty ring, make sure you spin that up flush with the base of the Protank as shown in the image above.
The Protank has air channels cut into the base (it draws air from the top of the 510 connector up through the atomizer), and if all of those are exposed the draw will be much airier than if the beauty ring is sitting flush with the base. Also sealing off one or more of these air holes or air channels will tighten the draw on the Protank. Just don’t seal off all of them, or the Protank won’t function. I would suggest sealing one at a time until you get the draw you want. I would use Teflon tape for the airholes in the 510 connection, and hot glue for one of the air channels (I wouldn’t seal off both air channels).

Click to enlarge
Easy way to keep juice out of the center tube while filling
The center tube in the Protank is slightly smaller at the tank side than at the drip tip side. To prevent leaking (because you are going to have some liquid drain off of the atomizer into that tube if you remove the base after the Protank has had liquid in it), I run a cotton swab up into the center tube before unscrewing the base, like so:
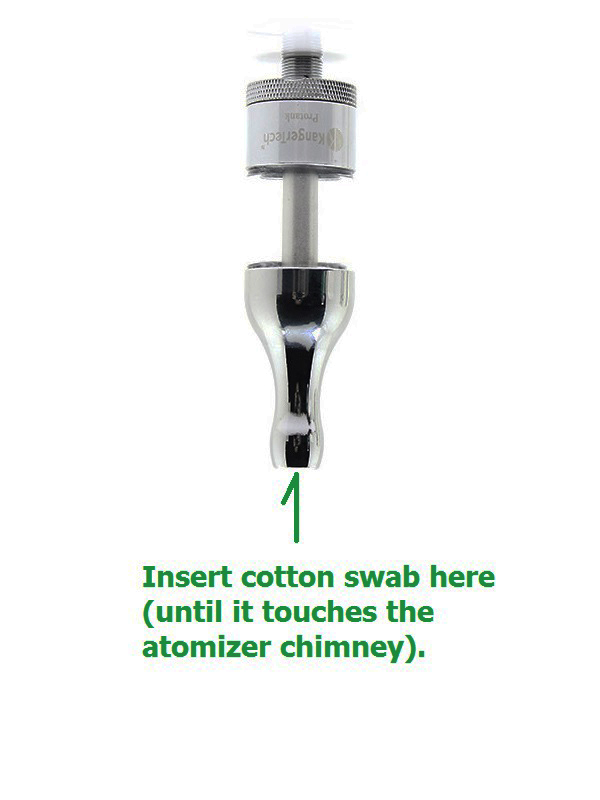
Click to enlarge
Once the swab is butted up to the atomizer chimney, I hold it there while unscrewing the base and withdrawing the atomizer. Once the atomizer is out, just push the cotton swab all the way up to the end of the center tube, but keep the head inside. That will effectively seal off the center tube, preventing accidental spills through the center tube. When done filling, simply withdraw the cotton swab and replace the atomizer and base.
Everything that I did not like about the Protank appears to have been fixed with the release of the Protank 2. Unless a couple of dollars is just too much (or you just really like the look of the original Protank), I would recommend opting for the Protank 2 rather than the original.

