Getting Started: Rebuilding a ProTank atomizer

When I initially set out to write this post, I had intended on building a basic coil on an IGO-L, but figured that while I was at it, I’d rebuild a ProTank atomizer or two with cotton wicks for my On The Go Kit. While doing that, I was on the phone with a friend, and we got to talking about the number of tanks that use a ProTank atomizer. I figured I’d be doing all of the people using those a disservice if I didn’t make a post that covers how to rebuild one. As a bonus, this particular build is both fairly easy (though as depicted does require some special tools, which you should have anyway), and produces one of the best Vapes that I’ve ever had. So, let’s build!

Supplies (Click to enlarge)

Supplies (Click to enlarge)

I’m using 30g Kanthal A1 (because I want a coil that is between 1.7 and 2.4 ohms), CVS sterile rolled cotton, an original ProTank, an 18g blunt tip syringe, and a generic ohm meter (if you don’t have one of these, I highly recommend picking one up, they are rather inexpensive, like $20, and very convenient). Not shown is a butane torch (I don’t know why I left that out of the photo).

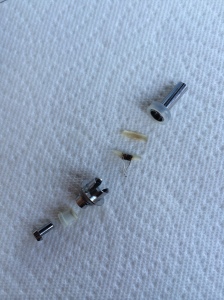
Disassembled atomizer (Click to enlarge)

Disassembled atomizer (Click to enlarge)

Pull the atomizer apart (pop the chimney off, and then remove the positive pin, and everything should just pull apart), and discard the old coil/wicks. Rinse and clean the parts that you are keeping in preparation for the new build (I usually just wipe them down real good).

Nothing terribly over complicated here. First torch the kanthal until it glows to both clean it, and to remove some of the springiness to make wrapping easier. I start with a 6-8″ piece of wire. You can always cut it shorter, it’s real hard to get it longer once cut. I leave 1.5-2″ legs at this stage (better too long than too short), and just wrap around the 18g blunt tip needle between 8 and 12 times depending on the resistance I want to end up with.

Click to enlarge

Click to enlarge

You can see here that I’ve done a 9/8 wrap. This should get me between 1.7 and 1.8ohms on the final coil. Next you want to compress the coil at one end and hold it there for a few seconds. This makes it much easier to get it compressed in the pliers later.

Click to enlarge

Click to enlarge

Now we need to torch the coil to get it to retain its shape. Slide it off of the needle, and carefully grip it in some pliers. I hold the hottest part of the torch flame on the coil for a solid ten seconds once I get it in the pliers straight:

Click to enlarge

Click to enlarge

Here is where this pays off, put the coil back onto the needle, and mount it into the atomizer base, as shown below:

Click to enlarge

Click to enlarge

This makes mounting coils on these atomizers a cinch. The needle is thin enough that it places the coil at the bottom of the channel in the sides of the atomizer base. This is the perfect position. Get the coil centered and put the insulator ring and positive pin back in place (remember that one leg of the coil goes inside the insulator ring, and the other goes between the insulator ring and the atomizer base).

Click to enlarge

Click to enlarge

As you can see from the image above, I don’t push the positive pin all the way in. I leave it sticking out enough that it can be seated correctly once the atomizer is installed in the tank base. At this point I will twist off the excess coil leg lengths, so that the they are flush with the base. You can clip them off, but I find that a little spin and wiggle will break them off more cleanly. Make sure the coil is centered in the split, and not touching the sides of the atomizer base, and remove the needle.

Centered coil (Click to enlarge)

Centered coil (Click to enlarge)

Let’s test it out real quick:

Perfect!

Perfect!

Now we need wick! Here is how much cotton I will need (this is actually a bit more than I’ll need):

IMG_0878

Click to enlarge

You can see that it doesn’t take much at all. I’ll tell you now, you should go wash your hands with a non scented soap. I use sterile cotton and I can taste the difference in my wicks when I do wash my hands at this point and when I don’t. Once you are ready, tear about half of that cotton off lengthwise, and roll it into a wick shape that will fit inside the coil you mounted. You don’t need terribly much cotton here.

Click to enlarge

Click to enlarge

Again you can see that it doesn’t take much. Once you have the wick twisted, you just slide it into the coil. I find it helpful to clip off the very tip of the wick, and spin it as you insert it, so that it slides in easier. Once mounted, clip both sides off flush with the outside edge of the atomizer base like so:

First wick trimmed

First wick trimmed

I then use the rest of the cotton as a “flavor” wick. This does a couple of things; it keeps the coil wetter, it prevents hot juice popping into your mouth, and creates a better seal in the tank. I make the wick tails long on purpose, like so:

Second wick added

Second wick added

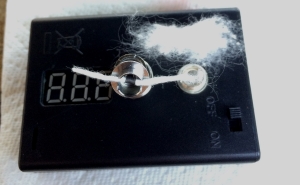
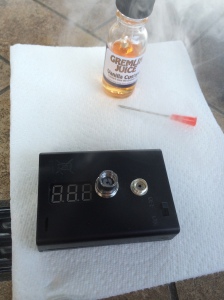
Now we need to prime the wicks. Cotton’s one drawback is that it burns rather easily. make sure you get it wet, and keep it wet. Burned cotton is nasty.

Prime the wicks

Prime the wicks

Reassemble the atomizer, and tuck the wick tails into the atomizer base.

Click to enlarge

Click to enlarge

Make sure that your top wick is not too dense, as you want juice to easily flow through it, but it should provide some barrier to juice just pouring into the atomizer. Let’s test it one more time and fill her up!

No changes is a good thing!

No changes is a good thing!

Now we can fill and prime the atomizer. Once the tank is full you need to either let it sit for about five minutes, or give it a few long draws to get all the air out of the wicks and ensure they are saturated with juice.

Let the air out (Click to enlarge)

Let the air out (Click to enlarge)

That’s it, this should now be ready to vape.

Delicious vapor!

Delicious vapor!

I personally think that this is the apex build for ProTank atomizers. It is flavorful, and easy enough to build.

end

Why I like cotton wick

Dude, you think wicks grow on trees?

Dude, you think wicks grow on trees?

I could tell you that have not entirely unfounded health concerns about vaping on silica wick, or that I have even more concern about the materials being sold as silica wick. Or that I’m pretty sure micro particles of chromium steel coming off of stainless steel mesh wicks are not healthy to inhale, nor are carbon particles from the oxidized wicks, or the iron oxide that will inevitably form from the steel sitting in the juice.

I smoked a pack a day plus for twenty years while knowing that I was basically playing Russian roulette with my health, so clearly I’m not scared of a little bit of potential health risk.

But that ain’t the truth.

The truth is, I’m lazy. And cheap.

Cotton as a wick material has many advantages. It’s cheap, readily available, produces a thick flavorful vapor, and hasn’t been shown to be harmful when inhaled in any manner. The extremely high likelihood that it is also safer than the alternatives is not a bad bonus either.

It does burn rather easily, but that is a trade off I’m willing to make.

I see lots of different products recommended as sources of cotton, but many are unquestionably dirty, and some are of questionable composition.

Enter sterile rolled cotton. For like six bucks I buy 4 ounces of sterile rolled cotton (cheap, check) that is sterile (so it’s clean and thoroughly tested for medical applications), so I can use it right out of the package without having to boil and dry it (lazy, check).

It also produces the best vape I’ve ever had. For some unknown reason, I can actually taste silica wick in my vape. With cotton I taste nothing but delicious vapor.

The best part is that if I run out, I can find it in any pharmacy for just a few dollars.

If you haven’t tried cotton wick, I highly recommend it.

Now, if I could just find a cheap local source for resistance wire…

end

PSA – My absence

Sorry folks, once in a while the real world intrudes and our hobbies fall to the wayside for a bit.

I’m in the middle of a job change, and unable to post for the last few weeks.

It’s going to be extremely light posting for the next couple weeks as I get settled into the new gig.

Not going anywhere, just super busy right now.

Vape on!

end

Hardware Review: V3 MOD (Hcigar Brass Sentinel Clone)

V3

Specs

Material:  Brass
Length:  25mm (~1″)
Diameter:  94mm (~3.7″)
Battery type:  18350 to 18650 (telescopic, max battery length 76mm)
Battery Connection:  510
APV Type:  Mechanical
MSRP:  $19.95USD
What’s in the box:

Click to enlarge

Click to enlarge

  • (1) All brass telescoping V3 MOD

Pros

  • Self adjusting positive pin (spring loaded).
  • Sturdy.
  • All brass construction; low voltage drop.
  • Accommodates multiple battery sizes.
  • Inexpensive.
  • Clean cut and well formed threads.
  • Reverse  threaded locking ring.

Cons

  • All brass construction; tarnishes easily
  • Chinese clone.
  • Spotty availability.
  • Threads loosen rather easily.
  • Locking ring threads can become “locked” when engaged and the switch is loose.
  • Switch loosens with regular use (see errata section below for fix).

Errata

Switch issues

Click to enlarge

Click to enlarge

The Bottom firing switch on this mod comes unscrewed with normal use. This can lead to unintended firing (in theory), but mostly leads to the locking ring not engaging or disengaging properly. Once stuck, the easy solution is to spin the firing button counter clockwise a bit to allow the locking ring to spin all the way around on the internal threads and re-engage.

This is due to the way the firing button and the negative pin are connected. The simple fix is to disassemble the switch, and wrap the threads on the firing button post with Teflon tape (the thin white stuff sold at hardware stores, it’s super cheap). I’ve seen people use locktite, but that will preclude ever taking the switch apart without damaging it, and if the switch gets dirty or gritty feeling, there is no way to fix that without disassembly.

Disassembly

V3_2

Click to enlarge

The entire mod can be disassembled without any tools, which makes cleaning convenient. The picture above shows it mostly disassembled, the top cap also screws off, and can be fully disassembled (as can the switch).

Ribbing

You cannot see it from any of the pictures online, but the ribbing on the body of the mod is actually square cut. This makes the mod quite grippy, and I like it. I only note this because I was under the impression that the ribbing on these was rounded, and didn’t realize it was actually square cut until I handled one at a local B&M.

Maintenance

You have a choice to make with an all brass mod; do I polish it or not?

Brass tarnishes fast, especially when you handle it. The ribs that make this mod so nicely “grippy” are also going to add enormous pain to any polishing effort. Personally I like the look of tarnished brass. If you’re going to polish it, you can use any suitable brass polish (such as Brasso or Mothers Billet Metal Polish).

Actual cleaning can be done with a cotton swab and some high alcohol content isopropyl alcohol.

If you are concerned about conductivity, you can take a brass wire brush to the threads once a month or so if desired. I usually use an old (clean) toothbrush to clean out the threads, wipe the 510 connection with a cotton swab dipped in isopropyl alcohol, and then wipe the whole thing down with a clean microfiber cloth.

Brass has very good conductivity, but if you are really worried about getting the absolute best connection possible, you can apply a tiny bit of NO-OX-ID A-Special (Noalox doesn’t work great on brass) to the threads (not the 510 threads, just the other threads on the mod), but I don’t think it’s necessary at all.

Verdict

I picked this up at a local B&M on a visit to replace a misplaced beater K101 (which I’m fairly certain is somewhere chillin in the Sierra Nevada Mountains where I frequently go shooting). I paid about double what you could order this from Fasttech for (which is ok because it is supporting a local vendor, and I feel it is worth every dime). I’ve been very happy with the performance of this mod, and would definitely recommend it to anyone looking for an inexpensive mech.

I feel conflicted about buying a clone, but not terribly so as I would never spend Sentinel money on a beater mod.

end

Battery Data: MNKE IMR-18650

Battery Data

Specs

Click to enlarge

Click to enlarge

Brand:  MNKE
Model:  IMR-18650
Chemistry:  Lithium Manganese Dioxide (LiMn02)
Bare Cell:  Unknown
Capacity:  1500mAh
Diameter:  18.3mm
Length:  65mm
Positive end:  Flat top
Lowest Discharge Voltage:  unknown
Max Charging Current:  6.5A
Life Cycle:  300 charge cycles
Maximum Continuous Discharge Rate (CDR):  20A (60A pulse)
C Rating:  ~13.3 (calculated from CDR)
Source:  Here

Use

Regulated APV?:  Yes
Mechanical APV?:  Yes
Lowest Atomizer Resistance before damage?:  0.2Ω

end

Hardware Review: IGO-W

Specs

Material:  Stainless steel
Length:  25mm (~1″)
Diameter:  22mm (~7/8″)
Battery Connection:  510
Number of posts:  3
Post holes:  Yes
Number of air holes:  1 (mine came with two, I suspect the second was done by the vendor)
Diameter of air hole(s):  ~1mm
MSRP:  $19.95USD
What’s in the box:

IGO - W

  • (1) IGO-W deck
  • (1) IGO-W top cap
  • (1) Bag of spare parts (2 o-rings, 1 post screw, 1 insulator, 1 small piece of wick and 1 small piece of wire)

Some retailers include the spare parts baggie, some do not. The actual price for these guys ranges from about $13 to $27 depending on vendor (available here, among others).

Pros

  • Price.
  • Two negative posts.
  • Post holes!
  • Simple, easy to get working.
  • Spacious drip well makes dripping super easy.
  • Large deck (this is relative with RDA’s).
  • Philips head post screws, no allen wrench to fool with.

Cons

  • ~1mm air hole creates a very tight draw.
  • Youde logo laser etched on the top cap.

The small air hole is pretty standard for RDAs, but that logo. Ugh, it looks terrible. If anyone in China is seeing this, don’t do that with the logos. We don’t care. If you must put a logo on it either engrave it, or put it on the bottom of the deck where is it not going to screw with the aesthetics of our APVs.

The logo will sneak up on you because of how it is etched, from some angles it is nearly invisible, and in some lighting it looks like this:

igow-logo

By the way, that is a neat feature, being able to use the top cap as a stand for the deck like that.

Errata

Air flow

As I noted at the beginning, these ship with a single ~1mm air hole, and some vendors are drilling a second before selling them. That ugly logo that is laser etched in the top cap is directly where a second air hole would be drilled (on some units, on others it is off to the side).

That single ~1mm air hole is going to limit your cloud chasing. While I’ve seen people bore these out huge, it seems that the sweet spot for most people is somewhere between 1.4 and 1.6mm. That’s not a huge change from the stock air hole, but it makes worlds of difference when it comes to the vapor produced.

I drill out my RDAs to 1/16″ (~1.5mm), and the IGO-W was no exception. With dual 1/16″ air holes the draw is kinda airy, but I prefer that on my RDAs.

Dual coils the easy way

The primary reason I bought the IGO-W is that I wanted to play around with ribbon kanthal, but the IGO-L doesn’t have post holes, and I have a devil of a time with getting ribbon mounted to post screws. Let me save you a whole bunch of time and frustration; use one single piece of wire (or ribbon) to wrap both coils. Here is how I do it:

  • Tighten the wire on one of the negative posts (those are on the outside).
  • Wrap the first coil, and on the last wrap, pass the wire all the way through the center post.
  • Adjust the first coil and tighten off the center post.
  • Wrap the other coil the same way.

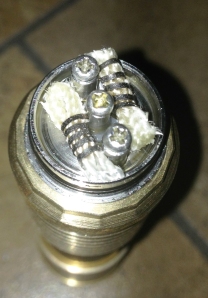
Here is what the results look like:

Click to enlarge

Click to enlarge

Maintenance

Like most RDAs, just rinse off the deck (with coils mounted even), and let dry. I will occasionally dry burn the coils if they get terribly gunked up (which doesn’t really seem to be an issue with ribbon kanthal and ekowool so far, but I suppose that could just be the juice I am dripping).

In my review of the IGO-L I said that it was just about the perfect beginner RDA, well it just got dethroned. When my biggest complaint is that your logo is on it, you’ve done something right.

end

How To: Calculate battery life for your APV

0

I’m sure everyone has experienced that sinking feeling when you try to use your (insert electronic device here) and you get a symbol that looks like the one to the right, or it just flashes and turns off. If you’ve just quit smoking, and that device is your APV, you might be in for some trouble.

I have a friend who vapes, and despite his tiny 350mAh eGo battery dying (literally) every day when he is trying to use it, he is absolutely bewildered by why it won’t last through lunch. So today I explained it to him, and in the process I got to wondering how many vapers don’t know how to accurately estimate the battery life of their (specific) setup.

So let’s do that using my friend as an example.

We have this 350mAh eGo battery putting out (roughly) 3.3v, and a Kanger EVOD with a 1.8Ω atomizer head. So a quick trip to an Ohm’s Law calculator (or some math if you’re handy like that) tells us that this setup is drawing 1.8A.

The formula for estimating battery life is: C / I * 0.7 = ABL

Capacity (divided by) Current Drain (multiplied by) 0.7 (equals) Approximate Battery Life (in hours)

Multiplying the result by 0.7 is a way to account for external variables (like temperature which can have an enormous impact on run time) that would be needed to get a more accurate estimate of run time. It is generally agreed that a 30% variance should cover most unknowns.

Since we’re not really going to be dealing in hours with vaping (the batteries we use just aren’t big enough), we need to alter this just a bit to get a run time in minutes (just multiply the result by 60).

So how long will this setup run approximately? 350 / 1800 * 0.7 = 0.136 * 60 = 8.16 minutes.

So why isn’t your little tiny 350mAh eGo battery making it through lunch?

Red

Because you would need almost two of those to support the amount of vaping you’re doing.

This is also handy to know when trying to determine if your battery is degrading, or when trying to figure out how many batteries you’ll need to take on a trip with you. Unless you prefer to just load up everything.

Oh, and here is a handy online battery life calculator.

end

Battery Data: Efest IMR 18650 (1600mAh)

Battery Data

Specs

Click to enlarge

Click to enlarge

Brand:  Efest
Model:  IMR 18650 (1600mAh)
Chemistry:  IMR (LiMn)
Bare Cell:  Unknown
Capacity:  1600mAh
Diameter:  18.1mm
Length: 65.2mm
Positive end:  Flat Top
Lowest Discharge Voltage:  2.5v
Max Charging Current:  Unknown
Life Cycle:  Unknown
Maximum Continuous Discharge Rate (CDR):  15A
C Rating:  10C (this was confirmed in an email by an Efest employee)
Source:  Here

Use

Regulated APV?:  Yes
Mechanical APV?:  Yes
Lowest Atomizer Resistance before damage?:  0.3Ω

end

PSA: Dr. Konstantinos Farsalinos, Cardiologist at Onassis Cardiac Center Athens, Greece discussing his study, “The effects of vaping on the cardiovascular system, comparison with cigarette smoking”

Dr. Farsalinos starts at 19:14.

This is long but well worth watching as the good doctor debunks several falsehoods we hear about vaping on a regular basis.

If you really want to hear the opinion of a cardiologist who has done first hand research on vaping, this is for you.

end

Battery Data Panasonic NCR18650PD

Battery Data

Specs

Click to enlarge

Click to enlarge

Brand:  Panasonic
Model:  NCR18650PD
Chemistry:  NCR (LiNiCoAl)
Bare Cell:  Yes
Capacity:  2900mAh
Diameter:  18.1mm
Length:  65mm
Positive end:  Button top / Flat top
Lowest Discharge Voltage:  2.5v
Max Charging Current:  1.375A
Life Cycle:  >200 charge cycles
Maximum Continuous Discharge Rate (CDR):  10A
C Rating:  ~3.4C (calculated from CDR)
Source:  Here (this is the only data sheet I could find for the cell online)

Use

Regulated APV?: Yes
Mechanical APV?: No (I wouldn’t, but it will function)
Lowest Atomizer Resistance before damage?:  0.5Ω

end