In a previous Getting Started post I covered Mechanical APVs in a 40,000 foot overview sort of way. Mechs are a fairly complex topic, and deserve a more thorough explanation.
Advantages of Mechanical APVs
With the advances in VV/VW regulated APVs, why would someone choose a mechanical APV? At first glance it would seem that it makes more sense to choose a wide variety of features than something as simple as most mechanicals.
Simplicity
While at first blush the very simplicity of a mech seems a disadvantage, it is one of its strongest draws for many.
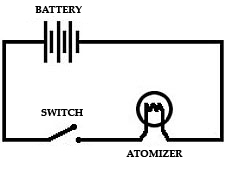
The diagram at the right is essentially the entirety of a mechanical APV. There are no electronic components. This means that it is far less likely to break or fail than a regulated APV which contains a control circuit and safety features. This also makes it far easier to repair if it does break or fail.
Control
Since mechs essentially create a direct connection between the battery and the atomizer, they require that you control every aspect of the vaping experience by varying the resistance of the atomizer. Want an 8w vape? You’re going to need to put a 2.2 ohm atomizer on a fresh battery. How did I know that? Ohm’s Law. You’re going to need to get very familiar with it if you want to use a mechanical APV to its full potential (and be safe while doing it). There are dozens of Ohm’s Law calculators online, I like this one.
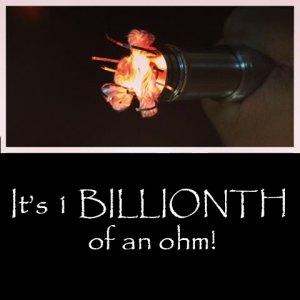
The pay off for this work is that you can run sub ohm coils (this is not to say that you necessarily should, but you can), because there is no protection circuitry.
Which can lead to things like this:
Chasing clouds like that is dangerous. I don’t advocate anyone do it (you can get plenty of righteous clouds without going crazy). But is sure looks cool every now and again. You’re definitely not getting that cloud out of a regulated APV, stuff like that requires the right mech in the right configuration.
Craftsmanship
Now I like my Sigelei ZMAX v3 telescope, but when it comes to craftsmanship, it can’t hold a candle to a Sentinel, Zenesis, or any of dozens of other mechs. I’m not talking clones here, I’m talking about high end mechs here. They are expensive, but they are well made. There are no machining marks, no uneven grinds, no gouges. A well made mech is a thing of beauty (maybe I’m a bit biased, I used to be a machinist).
A ProVari is nice, but it’s not anything like a Caravella or an Nzonic. Some people just appreciate a well made piece of hardware and are willing to pay for it.
Mech Safety
The picture of the guy practicing for the man made eclipse event in the coming Olympics above reminds me that I need to talk about safety here. Mechs don’t have any built in fuses or safety circuits, so there are a few things you’ll need to know before using a mech that can keep you from blowing your face off.
Buy a multi-meter and test everything regularly
You need to test the output of your batteries so that you know when they are charged (or if a charger is over charging them), when they are depleted, and when they are beginning to fail (draining much faster than normal).
Aside from that, you need to be able to test your atomizer for resistance and shorts.
Unlike with regulated APV’s, a mech will still fire even if there is a short present in the atomizer. It is imperative that you test for shorts before you attach the atomizer to the mech, and that you test the mech itself for shorts.
Battery Safety
If you haven’t read the Battery Basics post, now is a good time to do that.
I’ll reiterate here that it is super important that you understand current draw and how it is calculated for your battery.
I personally won’t use anything but AW IMR batteries in APVs. I strongly recommend that you not either (at least some variety of IMR cell, the chemistry really is that much safer).
Fuses
There are a couple of different companies making fuses for use in mechs. I highly recommend using them. The VapeSafe is one that is really popular, and some mechs are now coming with a fuse (like the K100/K101 series of clones).
This will prevent doing things like this:
But, it will also prevent catastrophic battery failure, which is just a bit more important.
Venting
Venting is nothing more complicated than holes or slots that provide a direct path between the battery and the outside world. Bottom venting alone is really not sufficient, as most batteries will vent from the top, and a failing battery may swell and effectively seal off bottom vents.
All APVs should have venting, but this is especially important in mechs because (despite all of my warnings to this point) people are going to play with sub ohm coils and some will overdraw their batteries. Vents allow the gas (and possibly flames) from a battery failure to leave the mech in a safe(ish) way, rather than turning the mech into a mortar or grenade.
Ideally, all APVs would follow this standard for venting, but not many will.
Battery Safety Revisited
Yes it really is that important.
Do not use batteries that are fully discharged
The batteries that we use in APVs are not like the batteries in your television remote. The chemistry of these batteries dictates that certain precautions be taken.
The batteries that we use typically output 4.2v on a full charge, and this will reduce with use. These batteries can typically be used down to somewhere between 3.6v and 3.2v safely (some well made batteries such as AW IMR’s, can go lower than this even).
Generally the vapor output will change notably when it is getting close to empty. A good rule of thumb is to change the battery when you feel it might need it.
Do not invert batteries
Due to the simplicity of mechs, they will function with the battery inserted either direction (generally proper orientation is that the positive side of the battery goes toward the atomizer). This is not a good idea. With the battery inserted the correct way, the spring and body of the mech will be “negative”, with the positive terminal separated from the negative terminal by the switch.
This is important because every part of the actual battery (with the exception of the positive terminal) is also negative. So if your battery wrapper were to become torn or be pierced, the negative part of the battery would be in contact with the negative part of the mech, preventing a short. Also, many mechs utilize a “hot” spring, that will collapse if a short occurs, physically separating the positive terminal from any potential short if overheating occurs. This is a fairly effective way to prevent many cases of thermal runaway.
If on the other hand, the battery is inserted reversed, the spring and body of the mech become “positive”, and any tear or nick in the battery wrapper will expose a negative portion of the battery to a direct connection to the positive terminal of the battery, creating a dead short. This is the fastest way to achieve thermal runaway and experience a critical failure of your battery.
Do not stack batteries
There are several issues that arise in stacking batteries, not least among them being the doubling of output voltage.
Perhaps the most serious issue with stacking batteries is that it becomes much more likely that you will overdraw one. Batteries will wear at different rates (this is even a problem when using two identical batteries from the same manufacturer – even the same run of batteries). Eventually this leads to a situation where one battery is completely discharged, and the other can still fire the mech. The problem with this situation is that both batteries are still experiencing current draw.
Use a good charger, do not overcharge batteries
If you are going to use unprotected cells it is imperative that you not leave them on the charger once they are done charging, and that you test them with a multi-meter directly off of the charger. The batteries will continue to take current until they reach the point of failure. With these batteries more than any other, a quality charger is paramount.
Prevent accidental firing
If your mech has a locking mechanism for the switch, use it. If it does not, don’t leave a battery in your mod if there is any conceivable way the mech could fire.
One of the leading ways that APVs are damaged is through accidental, continual firing. This is most common when transporting them by dropping them in a pocket or a purse. Many mechs have locking rings or other locking mechanisms to prevent this. If your mech has this feature, use it.
Mech features
Generally speaking, all mechs are composed of the same basic components:
- A battery tube
- A switch
- An end cap (may also contain the switch)
- An atomizer connection
While all mechanical APVs have these features, they are not always in the same place, nor do they always function the same.
Switches
Generally come in two varieties; magnetic and spring operated. They function exactly like you would think: a spring or an opposing pair of magnets is used to keep the switch in the open position until the user physically closes them.
The switch can be located in several places:
- In the end cap
- In the top cap
- On the side of the mod at the bottom (pinky fired)
- On the side of the mod at the top
- On the side of the mod anywhere in between
Generally speaking magnetic switches are more expensive, and are also smoother, but still fairly rare in the vaping world.
Threading
Most mechs are made with a proprietary threading that precludes their parts from being interchangeable, though House Of Hybrids has recently made their Z2 thread spec public (the threading pattern used in the Zenesis 2 line).
The hope is that mech makers will use the Z2 spec as a standard, making many mechs capable of using parts from other vendors, leading to some truly one of a kind mechs.
Lance at SteamMonkey is the first to take advantage of this and has released a switch using the Z2 thread spec, and has a mech planned that will utilize the Z2 spec throughout.
Hybrids
Hybrids are nothing more than an APV with a built in atomizer (the Zenesis is a great example of this, it can be had as a hybrid or with an optional 510 connector end cap). These provide a very sleek form factor device as the topper is made specifically to work with the mech body.
The Best of Both Worlds?
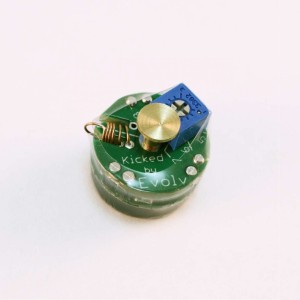
Recently there have been some devices like the Evolv Kick and it’s clones that bring variable wattage functionality to mechanical APVs. Some people love them, some hate them. Some mechs support them, some don’t. I have not used these devices, but I like the principle. The beauty of a mech with the ability to change wattage without changing the atomizer.
Hopefully that is enough to get you interested in mechs, and maybe consider trying one.


Been thinking of getting one, but have decided to hold off until Vapercon 3 (vapercon east) to get one
I’m finding the first paragraph under the “Do Not Invert Batteries” section confusing. Are you saying that the proper way to insert a battery into a mech is with the negative terminal facing the atomizer or the positive terminal? Seems like to me the proper orientation to prevent thermal runaway in case of a breach through the mech would be with the negative side facing the atomizer away from the switch, but that’s not what you say within the parenthesis.
The positive side of the battery should always face the atomizer in a mech. The center pin in atomizers is often referred to as the “positive” pin for this reason.
There are people who invert their batteries, and in theory it should work fine, until you have a short. I do not recommend doing this.
What confuses me is if the positive side is facing the atomizer, the atomizer is always in contact with the positive side of the battery. At this point the only thing stopping the mech from firing is the button connecting to a negative point on the battery to complete the circuit. If the outside of a battery is negative and the tube of the mech gets bent, breaks through the battery’s wrapper, and makes a connection, that completes the circuit and would cause a short, no?
What you describe is called a “soft short”. In this instance, the short will be running through the atomizer, so once it gets hot enough to either pop the coil or melt an insulator, the short will be broken.
If the battery were inverted in the same situation, you have what is called a “hard short” where the electricity is running through a path where there is nothing that can give before the battery.
The first situation leads to a popped coil or a dead atomizer in the worst case. The second situation leads to thermal runaway in the battery in the worst case.
Ohhh, I understand now. The thing I got caught up on is that these are actually two different scenarios. A “hard short” as you describe it would require the button to be depressed (or fail) in order to complete the short; without the button being depressed onto the positive terminal of the battery there is no short (atomizer is negative, side of mod is negative, therefor no short). A “soft short” doesn’t require the button to be depressed as the circuit is complete regardless of the involvement of the button.
Thanks for clarifying, it was driving me crazy trying to figure this out!
I’m entering the world of mech mods, and I’ve been researching everything I could for about a week now, but I’m still a bit confused on one thing. I used the Ohm Calculator that you linked and put in my battery’s specs (Sony VTC5 2500mah), and when I hit calculate, I got 0.14 ohms. Now does this mean that’s as low as I can safely go or that this is the danger zone? Btw, I’m not really interested in sub-ohming, although I do like the massive clouds. I would rather not risk injury at this point. Maybe once I’ve built a few coils… Also, I’m not sure if it matters, but I’m using a Stingray Mod and a TobH v2.5. Thanks for this article and your other ones, too! I’ve read them about a hundred times.
That is the theoretical lowest. I personally like to figure in a good margin for error so I wouldn’t build that battery any lower than 0.3 ohm (I generally don’t go below 0.5 ohm anyway.